Showing posts with label pattern review. Show all posts

Wednesday, December 2, 2020

Part 1: Free Pumpkin Patterns (Pumpkins I Made in 2019)

For the last 2 years, I decided to focus the month of October on making pumpkins. I didn't write a post about the pumpkins I made last year, so here is that post. I am writing a separate post for the pumpkins made in 2020. 

In 2019, the pumpkin craze began with the Tunisian Fall Pumpkins pattern from Arunima Goel of Knitter Knotter. I was so excited to test a Tunisian crochet pattern, and her pumpkins came out great in multiple sizes. It gave me the desire to make more. 

I tested this pattern for Knitter Knotter, and you can find her free pattern Tunisian Fall Pumpkins on her website.


The next pumpkin I made was the Cutest Plaid Pumpkin pattern from Meg Made With Love. She also has two more pumpkin patterns that she made as a set. Check out her Three Rustic Pumpkins patterns on her website.


The third pumpkin pattern I tried was the Pretty in Gingham Pumpkin from Devine Debris. Both the plaid pumpkin and the gingham one were much larger than the others I have made. Looking at this pumpkin now, I can see that I might need to add more stuffing and change the way it lines up. But I really enjoyed making the pumpkin, and I am proud that I was able to follow the design. 


Next up is the Chevron Pumpkin pattern from Made by Mandy. I made the smaller pumpkin with some scrap yarn. I really like the look of this. I need to try the larger version of this pattern. 


The last pattern I tried was the Velvet Pumpkins from To Craft A Home. She had a small and large mini velvet pumpkin to choose from. I had a skein of velvet yarn, so I made the larger size. I also made another one with some leftover orange yarn I had. Overall it was a great pattern, and I love the shape of these pumpkins.

Those were my 2019 pumpkins, and stay tuned for the 2020 Pumpkins post!

Friday, July 24, 2015

Pattern Review: Braided scarf and Yarn Stash: Franks Crafts Wintuk


Last month, I had the chance to make this Braided Scarf. I think I've had it in my Ravelry queue since the first time I signed up. 


I used three of my stashed yarns, including the Ombre Sayelle yarn I used in the Baby Bear Hat. The lighter green is the Caron Simply Soft Sage color I used from the Nautilus Cloche pattern. The bright green Frank's Crafts Wintuk yarn is one of a large bag of green and white yarns I purchased from a yard sale, when I just started crocheting. I used some of this green in the Poinsettia ornament pattern.

I used a I (5.55mm) crochet hook, and I did a foundation hdc of 120 stitches.

The blog wasn't really clear on how to sew the braid to make an infinity scarf. You can see in the picture below that I crocheted the three mini scarves together in a row. Now that I think about it, I would have stacked them and crocheted them together. I think I was almost running out of that yarn, so I didn't want it to go to waste. I might sew the stacks later.
I think it would look better if the braids were chunkier. But I am happy with the color combo, and I hope someone would like it.

I shared this blog post at:
Be A Crafter xD

Thursday, May 14, 2015

Pattern Review: The Hungry Caterpillar

My friend asked me to make a hat for her son's first birthday. The theme was the hungry caterpillar, and she wanted a hat for him to wear. I found this pattern from cRAfterchick and followed her directions. I was really happy with the results!

This was a different kind of project for me, because I had never used polyfill before. I'm glad I got the chance to buy a bag of it, so now I can do other projects like amigurumis and other stuffed parts for beanies. 


I wish I took more pictures of the party. All the snacks were themed from the book too, with apples, pears, plums, strawberries, and oranges.
 

They even had awesome cupcakes!
A photo posted by Lorenzo Cantera (@lcgram) on


The birthday boy seemed to enjoy throwing the beanie around and making me pick it up.


At least his older brother wanted to take pictures with the beanie on his head. I think I will have to make one for him too!

Friday, March 20, 2015

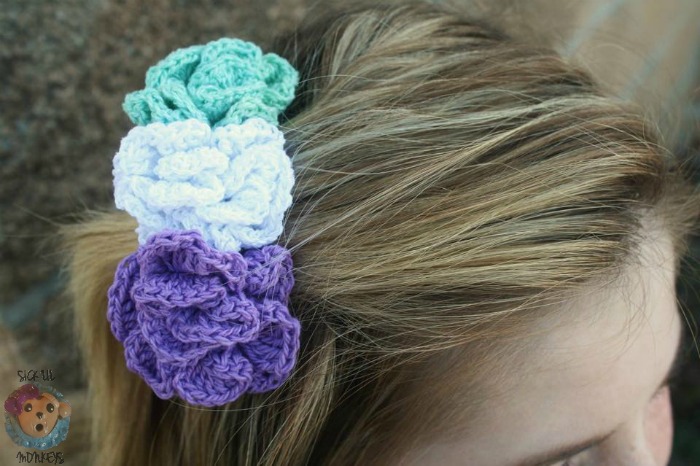
Pixie Blossom Hair Attire - Pattern Review


I have been trying to test less to make time to work on my own projects. But when I started seeing posts of lovely flower hair pieces from Sick 'Lil Monkeys on Facebook, I decided to join in.


I had the chance to test the twist holders.The small version is the blue pansy, and the rose is the large version. 
It was my first time using the Sizzle line from Red Heart. At first I was thinking of using a different yarn I had, but I wanted to see how different Sizzle was. This was also my first time using my B hook. 
The thread did slip around at first. But after getting the first few stitches in, the flower started coming together. The Sizzle thread had such a nice, clean look to it. The nylon texture was really smooth too, compared to other rough nylon yarns I have. The thread was strong, and it gave the flower a shimmery effect. 

The e-book has 6 flower patterns to choose from. I'm glad I got the chance to try out 2 different types.


There are so many varieties of hair accessories you can make with Sick 'Lil Monkeys pattern. You can purchase the full e-book on her Ravelry page. 

Click HERE to buy the full eBook for $2.00


Believe me, once you try one of the patterns, you will be jumping to try the rest of her ebook. To prove this, Sick 'Lil Monkeys is sharing two free patterns. You can find the pattern for the Braided Ivy and Headband on the Sick 'Lil Monkeys blog. This beautiful design made me want to try it out!


She is also sharing the Hair Comb and Rose Pattern on the Cre8tion Crochet website. Look how beautiful this hair comb looks! Imagine how many other flower combinations you can add to this design!
Pixie Blossoms Hair Comb free hair accessory pattern by Sick Lil' Monkeys exclusively for Cre8tion Crochet

I shared this blog post on: Stitch It Up Link Party #4, Best of the Blogosphere #11

Wednesday, November 5, 2014

Visor Beanie - Pattern Review

Finally, I feel free to write posts again! Believe me, that crochet block was difficult to overcome. Here's how it all started.

I told a friend on Facebook that I wanted to make a hat for her son in May. I was a part of my Summer Hat Challenge (#1 and #2). She was asking for different yarn, and I was looking for a good brim hat pattern. I didn't realize how much of a struggle that would be! I tried at least 5 different patterns. I knew how to change the radius of the hat, but I couldn't find a good sturdy brim. I even tried to add plastic to one brim to make it secure. Obviously it was a fail.

Browsing on Ravelry, I found this free Visor Beanie pattern from Suzanne Steiger. The website is no longer available, but if you have a Ravelry account you can get the PDF.

I tried the pattern with the original size J crochet hook. I don't know if it was the yarn or my stitches, but the hat came out 22 inches, larger than what was written.


The brim is two pieces crocheted directly on the hat and single crocheted together. I prefer making one full piece instead of having a few pieces and sewing together.

My boyfriend took a selfie wearing the hat. He always loves to try on my projects.


I tried the pattern again with an I hook, making sure I reduced a few rounds in the beginning circle. I stopped increasing at round 5, and I kept going in the round instead of joining. In the light blue section to the end of the hat I did a slip stitch join.

Thursday, May 15, 2014

Swirling Leaves Beanie from Creative Threads by Leah - Pattern Review

Here's another one of Creative Threads by Leah's lovely patterns. This is the Swirling Leaves Beanie, which is also one in a collection of other Swirling Leaves patterns she is working on.

This beanie was very easy to make, after I learned how to create the stitch.  The pattern shares a link to Moogly's Wrap Around Stitch tutorial, but I preferred the other tutorial she shared with us, the Connected Spiral Stitch from New Stitch a Day.


The sizes for this beanie is great, from 11" American Girl doll to 22" Adult. I was asked to test the 3-6 mo pattern. I didn't have a baby to try this on, so I tried it on my old baby doll and it fit. There's still some good use for my 23 year old dolly. Wish I got clearer pictures though. I was in a rush to turn the results in.

I will be making more of these beanies for my "baby hats for friends" project. It shouldn't be too bad when I can making a few of these quickly.

You can get this pattern on PDF for FREE from the Cre8tion Crochet website.
Swirling Leaves Beanie in 10 sizes, doll thru adult, designed by Creative Threads by Leah, exclusively for Cre8tion Crochet

I shared this blog post on: 
Love Bakes Good Cakes 

Friday, May 9, 2014

Nautilus Scarf Pattern from Creative Threads by Leah - Pattern Review and Giveaway

Remember this picture from the blog hop last week? This is another lovely Nautilus pattern from Creative Threads by Leah. This week I was testing the Nautilus Scarf.


And here is the finished design. It was a clean simple pattern similar to the Nautilus Cloche pattern she designed. I had plenty of Caron Simply Soft Yarn from the cloche I made the week before that I decide to switch the main color to make this scarf. 


I really like the spiral nautilus design.


You can purchase copies of this pattern and all her Nautilus designs in Creative Threads by Leah's Ravelry page. She will also be combining the Nautilus patterns to sell as a collection.
And don't forget to like her page on Facebook! Creative Threads by Leah on Facebook

Don't want to wait? WIN your own copy of the Nautilus Scarf Pattern!

Wednesday, April 23, 2014

Nautilus Cloche pattern from Creative Threads by Leah - Pattern Review and Giveaway


I had an opportunity to be one of the testers for the Nautilus Cloche pattern from Creative Threads by Leah. At first, I admit I was concerned about the difficulty. This is the first time I formally tested a pattern. Plus with the busy Easter weekend, I thought I didn't have the time to finish this. But I tried the pattern anyways, and I'm so glad I did!


I received the pattern on Monday, and I started working on the spiral. The hat builds from the bottom to the top, which was not usual for me. I had to restart the hat once, but when I got in the swing of it, the pattern was simple to follow. I finished the rest of the hat in 2 days, so it took lass than a week to put together.


See other patterns from Creative Threads by Leah


Enter to win a copy of the Nautilus Crochet Pattern!

Monday, April 15, 2013

Pattern Review: Lion Brand Perfect Purse

I'm going to write a summary of the instructions, and if you want you can go to the website and double check my work. Lion Brand Perfect Purse (You will need to register to see the free pattern).
The pattern is written in inches, so I'm going to translate it with approximate stitches. I prefer following a pattern that counts stitches then having to measure the work.

The purse begins with a chain stitch of 38. The first part of the instructions said to single crochet rows until you get 12 inches. I measured and it's about 37 single-crochet rows.


This shell pattern is easier than it looks! You just skip 4 single crochet stitches and crochet 4 double crochets in one single-crochet stitch.

I finished crocheting the shells on Friday night. The instruction stated to make rows of shells so that the whole piece is 17 in long. The shell portion measures 9 rows long, with 6 shells in each row.


The instructions then say to sew the sides of the bag together. I decided to do the slip stitch instead. I believe that it gives the sides a stringer hold, and you could always keep the bag like this instead of flipping it around. It gives it a more unified look.

The instructions also give you an optional strap pattern, which measures about 5 feet long. I counted the stitches as I was making it and it's about 225 single crochet stitches. Although I did run out of yarn at the very end, as you can see in the picture above. Sadly, that's what happens when I use old yarn that I might not find anymore.

The best part about this simple pattern is that you can make your purse and length or width you'd like. You can add a strap, sew in a lining, or add a zipper if you wish. I'm going to make more of these purses in different sizes, and I will use different color yarn to give it a modern look, since color blocking is so in-style right now.

Oh, I almost forgot. Check out this awesome button! This was also in the instructions. I'm going to make a separate entry with the directions. I just love buttons!


Tuesday, April 2, 2013

Pattern Review: Market Bag

A couple of years ago, I found this pattern for a market bag from Lion Brand (you will have to sign up to see the free pattern). I always wanted to make a large bag to carry my notebook and crochet supplies. It took me about a week to complete it, and the homespun yarn really made a nice effect on the pattern. I also loved that this bag has a big handle. Even if it stretches, I think it has a lot of give. And it's stretchy enough to throw over my shoulder.


Then I took a daring attempt and tried the pattern using plarn. What is plarn, you may ask? You can make plarn with plastic grocery bags. After a run to the supermarket, cut 1 inch loops from the plastic bags and loop them together. 

I think it took about 80-100 bags to make this bag. It is HUGE. The handle stretched a bit and the bottom rounded out more, but it's still functional. As I was making it, a friend purchased it from me. So I never go to use it. But I will make one for myself (one day).


Tuesday, March 19, 2013

Pattern Review: Sundance Slouch Hat for Crochet

I have been trying to find the perfect hat design for a friend that has dreads. I promised her to make a hat for her around Christmas time 2011, I believe. My family and I were ready to go on vacation to visit my brother, and I threw the project on the back burner. Almost two years later, I found the strength to start searching for a pattern. Luckily for me, I found it on Pinterest.


The Sundance Slouch, designed by Lasmama  (this picture is from the designer). You will need to join the Craftsy website to get a PDF of this FREE pattern. The pattern was simple to follow, at least for an advanced beginner like myself.

The first hat I made for my friend was with a red yarn. The yarn was one of the first skeins of year I received when I started crocheting, Sadly, I didn't keep the label, so I don't remember what the brand was.

I followed the pattern completely, including changing the hook from the J/6.00 MM hook for the brim to the K/6.50 MM hook for the body. Glad to say that my friend really liked it, especially the fact that it was snug on the brim. The hats she bought from the store would eventually loosen up around the edging, defeating the purpose of covering her head. I didn't take a picture of the hat I made her after I completed it. The next time I see her I will try.

I am trying to pattern again, only this time I increased the size of the brim from 8 to 12 single crochet stitches. So far it looks good, but I might have to use the whole skein this time to finish the top.


All in all, this is a great beginners hat pattern.

Printfriendly

Related Posts Plugin for WordPress, Blogger...